一、为什么要自定义Flutter engine?
由于我们编辑器有自定义排版的需求,所以我查看了dart framework层关于RichText的排版与绘制的流程,发现都是在native实现,也就是在flutter engine中使用C++实现的.所以我们是需要下载flutter engine源码,修改调试,并把自定义的flutter engine接入到我们的项目中.
二、Flutter engine的环境与编译
1.所需要软件支持
- Mac可以编译Android、iOS产物,Linux可以编译Android产物,windows都不能编译,Mac M1芯片目前是不支持编译的,需要自己找解决方案
- git工具
- python环境
- xcode
- Chromium
depot_tools
安装方式:
1. 选择一个目录例如 /Users/xxx/
git clone https://chromium.googlesource.com/chromium/tools/depot_tools.git
2. 配置环境变量
export PATH=${PATH}:/Users/aozhaoyang/Desktop/depot_tools
2.下载源码
1.先把flutter engine的代码clone到单独的仓库xxx:flutter/engine.git
2.除了flutter engine之外,还有大量google仓库需要我们download
- 创建一个engine文件夹,在里面放入.gclient文件
solutions = [
  {
    "managed": False,
    "name": "src/flutter",
    "url": 	"git@xxx:flutter/engine.git@6487eee49f19e3206f14c79754bf09ab249951e1",
    "custom_deps": {},
    "deps_file": "DEPS",
    "safesync_url": "",
  },
]- 使用gclient sync 同步代码,最好开下科学上网,网速快一个半小时左右,网速慢大概3-5个小时
- 到src/flutter 路径下执行engine的代码回退操作,这个需要回退到跟项目flutter sdk对应的engine代码,例如我们项目是flutter3.3.7
到/Users/xxx/fvm/versions/3.3.7/bin/internal/engine.version路径下找到flutter engine的hash值:857bd6b74c5eb56151bfafe91e7fa6a82b6fee25
git reset --hard 857bd6b74c5eb56151bfafe91e7fa6a82b6fee25
3.编译所需要的Android、IOS、Mac对应CPU架构产物
在src目录下分别执行准备构建文件和构建产物命令,如下
A、准备构建文件
- Android 只编译arm 和arm64架构,debug和release共4个产物,debug主要后面用来做调试,release用来打包
./flutter/tools/gn --android --unoptimized
./flutter/tools/gn --android --unoptimized --android-cpu=arm64
./flutter/tools/gn --android --runtime-mode=release
./flutter/tools/gn --android --android-cpu=arm64 --runtime-mode=release- iOS只用支持arm64就好,模拟器可以不考虑
./flutter/tools/gn --unoptimized --ios --mac-cpu=x64
./flutter/tools/gn --ios --mac-cpu=x64 --runtime-mode=release- Mac端 也需要编译debug和release,否则本地产物依赖时候无法运行
./flutter/tools/gn --unoptimized
./flutter/tools/gn --runtime-mode=release
B、构建产物
- Android
ninja -C out/android_debug_unopt
ninja -C out/android_debug_unopt_arm64
ninja -C out/android_release
ninja -C out/android_release_arm64- iOS
ninja -C out/ios_debug_unopt
ninja -C out/ios_release- Mac
ninja -C out/host_debug_unopt
ninja -C out/host_release
三、本地运行、调试、打包定制engine
1.打开项目,在pubspec.yaml文件添加如下依赖
dependency_overrides:
  sky_engine:
    path: <FLUTTER_ENGINE_ROOT>/engine/src/out/ios_debug_unopt/gen/dart-pkg/sky_engine
2.运行项目,指定本地engine
flutter run --local-engine-src-path <FLUTTER_ENGINE_ROOT>/engine/src --local-engine=ios_debug_unopt_arm64 -d deviceId
- local-engine-src-path:指定Flutter引擎存储库的路径,也就是src根目录的绝对路径
- local-engine:指定使用哪个引擎版本
3.调试engine
调试engine 需要安装lldb,Android Studio是无法调试,可以使用vsCode或者Xcode
在Runner/Flutter/Generated中做如下配置
FLUTTER_ROOT=${FlutterSDK 路径}
FLUTTER_APPLICATION_PATH=${Demo工程路径}
FLUTTER_TARGET=${Demo工程路径}/lib/main.dart
FLUTTER_BUILD_DIR=build
SYMROOT=${SOURCE_ROOT}/../build/ios
FLUTTER_FRAMEWORK_DIR=${Flutter_Engine代码路径}/src/out/ios_debug_sim_unopt
FLUTTER_BUILD_NAME=1.0.0
FLUTTER_BUILD_NUMBER=1
FLUTTER_ENGINE=${Flutter_Engine代码路径}
LOCAL_ENGINE=${输出的路径(ios_debug_sim_unopt)}
ARCHS=${支持的架构(arm64)}4.使用本地engine进行打包
方案一
直接使用--local-engine参数进行打包,但是这种方式只支持单个架构CPU的flutter engine产物打包,我们目前apk是需要支持arm和arm64两个cpu架构产物,此方案不能使用在我们项目上.
fvm flutter build apk -t lib/main.dart --local-engine=android_release_arm64 --local-engine-src-path=/Users/qimao/engine/src
方案二
1.iOS直接替换flutter sdk中的engine产物是生效的
2.Android直接替换到flutter sdk中的engine产物不会生效.因为flutter 1.12.x之后打包流程会直接走远程下载flutter engine产物.我们需要修改flutter.gradle脚本,直接从本地读取engine编译打包.
四、文本布局源码分析和两边对齐代码修改
编辑器实际上就是一个可以编辑的富文本,在flutter中富文本是通过RichText实现的.可以从RichText的源码入手,首先可以看下它的渲染方法createRenderObject.
 @override
  RenderParagraph createRenderObject(BuildContext context) {
    assert(textDirection != null || debugCheckHasDirectionality(context));
    return RenderParagraph(text,
      textAlign: textAlign,
      textDirection: textDirection ?? Directionality.of(context),
      softWrap: softWrap,
      overflow: overflow,
      textScaleFactor: textScaleFactor,
      maxLines: maxLines,
      strutStyle: strutStyle,
      textWidthBasis: textWidthBasis,
      textHeightBehavior: textHeightBehavior,
      locale: locale ?? Localizations.maybeLocaleOf(context),
      registrar: selectionRegistrar,
      selectionColor: selectionColor,
    );
  }
它的实现是RenderParagraph,继续看它的源码,可以看到它的布局是交给_textPainter实现的.
 void _layoutText({ double minWidth = 0.0, double maxWidth = double.infinity }) {
    final bool widthMatters = softWrap || overflow == TextOverflow.ellipsis;
    _textPainter.layout(
      minWidth: minWidth,
      maxWidth: widthMatters ?
        maxWidth :
        double.infinity,
    );
  }
继续查看的TextPainter的layout方法,它主要是创建了一个ui.Paragraph,通过它来进行布局.ui.Paragraph由ParagraphBuilder生成,通过设置ParagraphBuilder我们可以对文字进行各种TextStyle样式设置,以及设置宽高.其实已经可以控制文字的布局了:通过ui.Paragraph的paint去绘制文字.
  void layout({ double minWidth = 0.0, double maxWidth = double.infinity }) {
    assert(text != null, 'TextPainter.text must be set to a non-null value before using the TextPainter.');
    assert(textDirection != null, 'TextPainter.textDirection must be set to a non-null value before using the TextPainter.');
    // Return early if the current layout information is not outdated, even if
    // _needsPaint is true (in which case _paragraph will be rebuilt in paint).
    if (_paragraph != null && minWidth == _lastMinWidth && maxWidth == _lastMaxWidth) {
      return;
    }

    if (_rebuildParagraphForPaint || _paragraph == null) {
      _createParagraph();
    }
    _lastMinWidth = minWidth;
    _lastMaxWidth = maxWidth;
    // A change in layout invalidates the cached caret and line metrics as well.
    _lineMetricsCache = null;
    _previousCaretPosition = null;
    _previousCaretPrototype = null;
    _layoutParagraph(minWidth, maxWidth);
    _inlinePlaceholderBoxes = _paragraph!.getBoxesForPlaceholders();
  }
void _createParagraph() {
assert(_paragraph == null || _rebuildParagraphForPaint);
final InlineSpan? text = this.text;
if (text == null) {
throw StateError('TextPainter.text must be set to a non-null value before using the TextPainter.');
}
final ui.ParagraphBuilder builder = ui.ParagraphBuilder(_createParagraphStyle());
text.build(builder, textScaleFactor: textScaleFactor, dimensions: _placeholderDimensions);
_inlinePlaceholderScales = builder.placeholderScales;
_paragraph = builder.build();
_rebuildParagraphForPaint = false;
}方案一思路形成:通过自定义ui.Paragraph中的ParagraphBuilder来控制每个文字的宽高,根据每个文字的宽度可以算出总宽度,然后通过手机屏幕的宽度减去文字总宽度就可以算出每个文字之间的间距,这样就可以确定每个文字的偏移量,最后在ui.Paragraph的paint中根据偏移量去绘制文字,就可以达到控制排版的效果.
我按照上面的思路去看quill框架代码,并修改quill绘制层源码,实现了排版功能.其中遇到了两问题.一是文字还没开始绘制,我们不知道当前文字宽度设置多大合适,如果是长英文单词需要设置的大一点,普通文字需要设置小一点.二是因为每个字的大小设置不一样,每一个字都需要创建一个ui.Paragraph.我测试了下,编辑器输入1万字的时候就开始卡顿.所以这个方案以失败告终.
继续看了下ui.Paragraph的layout代码,可以看到native,具体实现在flutter engine里面.至此dart framework层的RichText流程就完了.想要更深入研究只能看flutter engine代码了.
/// Computes the size and position of each glyph in the paragraph.
///
/// The [ParagraphConstraints] control how wide the text is allowed to be.
void layout(ParagraphConstraints constraints) {
_layout(constraints.width);
assert(() {
_needsLayout = false;
return true;
}());
}
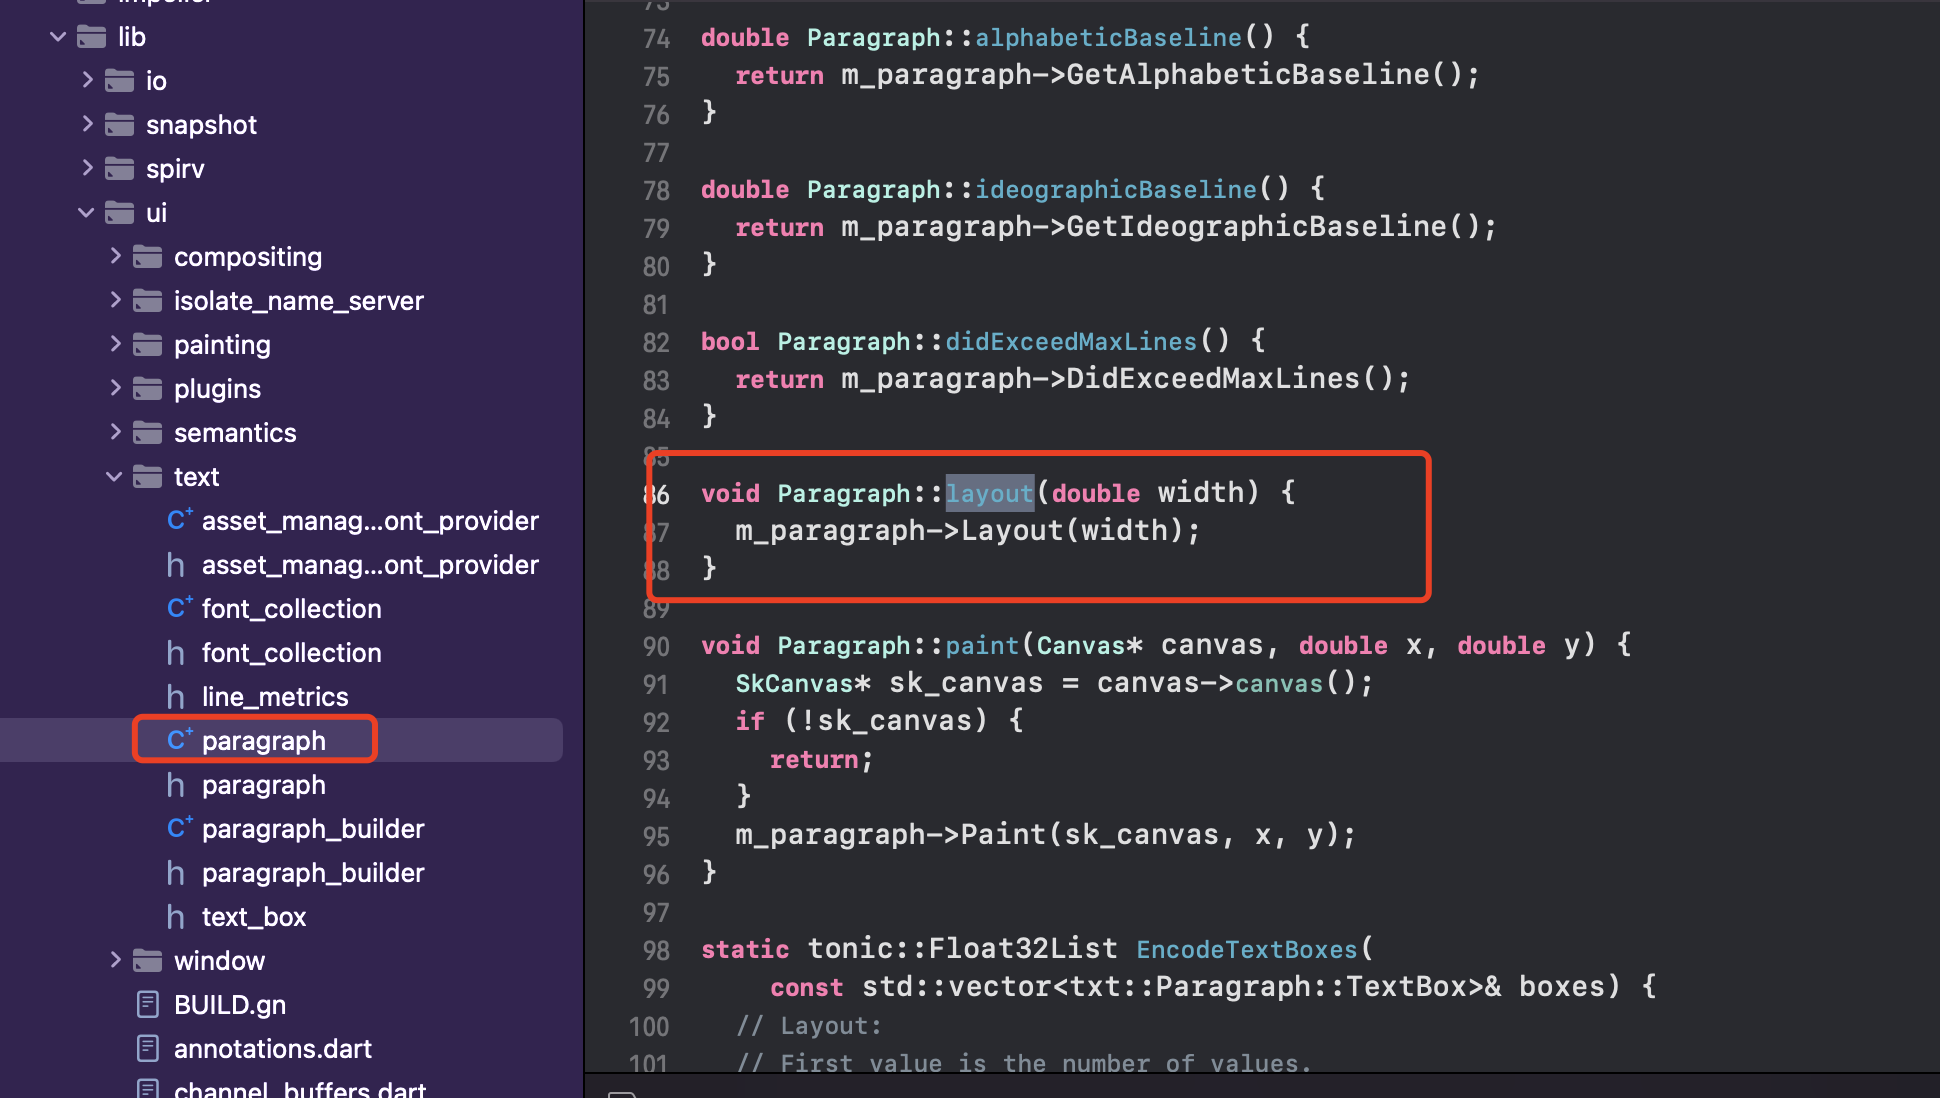
void _layout(double width) native 'Paragraph_layout';打开flutter engine 源码后,直接搜索Paragraph,可以找到flutter/lib/ui/text/paragraph.cpp.查看它的layout方法,发现Paragraph是个父类,并没有自己实现layout,它应该是有子类在做实现.
void Paragraph::layout(double width) {
  m_paragraph->Layout(width);
}
查看了下flutter/lib/ui/text/下并没有Paragraph的实现类,flutter engine库十分庞大,所以我通过断点发现它的子类ParagraphImpl,全局搜索找到third_party/skia/modules/skparagraph/src/ParagraphImpl.cpp.Skia是通用的图形渲染引擎.ParagraphImpl的layout的代码特别多,我们只需要看下行相关的排版核心代码.
  void ParagraphImpl::layout(SkScalar rawWidth) {
    ...
    if (fState < kLineBroken) {
            this->resetContext();
            this->resolveStrut();
            this->computeEmptyMetrics();
            this->fLines.reset();
            this->breakShapedTextIntoLines(floorWidth);
            fState = kLineBroken;
    }
    ...
  }
void ParagraphImpl::breakShapedTextIntoLines(SkScalar maxWidth) {
...
TextWrapper textWrapper;
textWrapper.breakTextIntoLines(
this,
maxWidth,
[&](TextRange textExcludingSpaces,
TextRange text,
TextRange textWithNewlines,
ClusterRange clusters,
ClusterRange clustersWithGhosts,
SkScalar widthWithSpaces,
size_t startPos,
size_t endPos,
SkVector offset,
SkVector advance,
InternalLineMetrics metrics,
bool addEllipsis) {
// TODO: Take in account clipped edges
auto& line = this->addLine(offset, advance, textExcludingSpaces, text, textWithNewlines, clusters, clustersWithGhosts, widthWithSpaces, metrics);
if (addEllipsis) {
line.createEllipsis(maxWidth, getEllipsis(), true);
}
fLongestLine = std::max(fLongestLine, nearlyZero(advance.fX) ? widthWithSpaces : advance.fX);
});
...
}TextLine& ParagraphImpl::addLine(SkVector offset,
SkVector advance,
TextRange textExcludingSpaces,
TextRange text,
TextRange textIncludingNewLines,
ClusterRange clusters,
ClusterRange clustersWithGhosts,
SkScalar widthWithSpaces,
InternalLineMetrics sizes) {
// Define a list of styles that covers the line
auto blocks = findAllBlocks(textExcludingSpaces);
return fLines.emplace_back(this, offset, advance, blocks,
textExcludingSpaces, text, textIncludingNewLines,
clusters, clustersWithGhosts, widthWithSpaces, sizes);
}layout布局的时候,会动态的根据文字的宽度把要显示的文字拆成多行.所以行(TextLine)就成为一段文字绘制的一个更小的单位.我们需要看下行相关的布局.TextLine代码也非常多,我找了下,并没有layout方法,只有paint方法.paint方法里面只有背景、文字本身、阴影、装饰等绘制.思路中断,我的导师王柯跟我说justify属性实际上是有两边对齐的效果的,只是中文符号和英文存在的时候不会对齐.我在TextLine中能看到一个justify的方法,代码如下:
void TextLine::justify(SkScalar maxWidth) {
    // Count words and the extra spaces to spread across the line
    // TODO: do it at the line breaking?..
    size_t whitespacePatches = 0;
    SkScalar textLen = 0;
    bool whitespacePatch = false;
    this->iterateThroughClustersInGlyphsOrder(false, false,
        [&whitespacePatches, &textLen, &whitespacePatch](const Cluster* cluster, bool ghost) {
            if (cluster->isWhitespaceBreak()) {
                if (!whitespacePatch) {
                    whitespacePatch = true;
                    ++whitespacePatches;
                }
            } else {
                whitespacePatch = false;
            }
            textLen += cluster->width();
            return true;
        });

    if (whitespacePatches == 0) {
        return;
    }

    SkScalar step = (maxWidth - textLen) / whitespacePatches;
    SkScalar shift = 0;

    // Deal with the ghost spaces
    auto ghostShift = maxWidth - this->fAdvance.fX;
    // Spread the extra whitespaces
    whitespacePatch = false;
    this->iterateThroughClustersInGlyphsOrder(false, true, [&](const Cluster* cluster, bool ghost) {

        if (ghost) {
            if (cluster->run().leftToRight()) {
                shiftCluster(cluster, ghostShift, ghostShift);
            }
            return true;
        }

        auto prevShift = shift;
        if (cluster->isWhitespaceBreak()) {
            if (!whitespacePatch) {
                shift += step;
                whitespacePatch = true;
                --whitespacePatches;
            }
        } else {
            whitespacePatch = false;
        }
        shiftCluster(cluster, shift, prevShift);
        return true;
    });

    SkAssertResult(nearlyEqual(shift, maxWidth - textLen));
    SkASSERT(whitespacePatches == 0);

    this->fWidthWithSpaces += ghostShift;
    this->fAdvance.fX = maxWidth;
}
这个其实就是我们要找的计算排版的核心逻辑:它会遍历当前行的每一个文字,计算出空格的数量和文字的总长度,然后使用行占用的最大宽度减去文字的总宽度,再除以空格的数量,就能得到每一个空格的偏移量.然后重新遍历整行文字,在每个空格地方加上之前算的偏移量.justify逻辑是可以做到等分空格的间距.我们做两端对齐,实际是需要等分每一个文字之间的间距,然后我们项目中还有首行缩进的功能,首行的第一个字前面是有两个空格的,我们在计算间距的时候不能把这两个空格加上,否则会导致首行第一个字母也会跟随文字变化而发生位置变化.我们最终修改代码逻辑如下:
void TextLine::justify(SkScalar maxWidth) {
    // Count words and the extra spaces to spread across the line
    // TODO: do it at the line breaking?..
    constexpr auto kWhiteSpaceNumOfStart = 2;
    size_t allCharNums = 0;
    SkScalar textLen = 0;
    size_t posOfCharFirst = -1;
    size_t firstResult = 0;

    this->iterateThroughClustersInGlyphsOrder(
            false, false, [&](const Cluster* cluster, bool ghost) {
                textLen += cluster->width();
                posOfCharFirst++;

                if (posOfCharFirst == firstResult && firstResult < kWhiteSpaceNumOfStart &&
                    cluster->isWhitespaceBreak()) {
                    firstResult++;
                    return true;
                }
                if (posOfCharFirst == 0 || (posOfCharFirst == firstResult)) {
                    return true;
                }

                ++allCharNums;
                return true;
            });

    if (allCharNums == 0) {
        return;
    }

    SkScalar step = (maxWidth - textLen) / allCharNums;
    SkScalar shift = 0;

    // Deal with the ghost spaces
    auto ghostShift = maxWidth - this->fAdvance.fX;
    // Spread the extra whitespaces
    size_t posOfCharSecond = -1;
    size_t result = 0;
    this->iterateThroughClustersInGlyphsOrder(false, true, [&](const Cluster* cluster, bool ghost) {
        posOfCharSecond++;

        if (ghost) {
            if (cluster->run().leftToRight()) {
                shiftCluster(cluster, ghostShift, ghostShift);
            }
            return true;
        }
        auto prevShift = shift;

        if (posOfCharSecond == result && result < kWhiteSpaceNumOfStart &&
            cluster->isWhitespaceBreak()) {
            result++;
            return true;
        }
        if (posOfCharSecond == 0 || posOfCharSecond == result) {
            return true;
        }

        shift += step;
        shiftCluster(cluster, shift, prevShift);
        return true;
    });
    SkAssertResult(nearlyEqual(shift, maxWidth - textLen));
    this->fWidthWithSpaces += ghostShift;
    this->fAdvance.fX = maxWidth;
}
五、总结
总体分为两大块:一块是分析Flutter 引擎 c++代码并修改,另一块是定制engine引入项目打包.两部分难度都挺大,定制engine打包遇到的问题更难解决.目前定制engine的公司不多,网上没有成熟的解决方案,我们的方案是一点点摸索出来的,希望对你有所帮助.